Last week was the 45th annual Young Authors’ Conference in Kamloops and it was a real privilege to be there with the passionate teachers and organizers, the amazing authors and illustrators, and—of course—the kids.
I delivered three different sessions on the topic of “So you want to go to Wizard School.” I emphasized making specific detailed choices in creating fantasy situations and then the kids invented magical schools. We brought these to life by writing acceptance letters from that school to a character . . . a letter delivered by a miniature flying broom!
We made the broom, of course . . . and that was a big challenge, since I had almost ninety kids cycle through my workshop room. But I was able to do it with A LOT of advance prep and some amazing class helpers.
One of the reasons I love making props with kids is because it really helps them approach “story” from a different angle. The kids physically made their brooms, problem solved ways to bring their ideas to life, and got to fold up their letters and tuck them into tiny envelopes to attach to their brooms. The story came to life for them!
I also loved how the kids were able to think outside the box. I purposely didn’t bring paint or any complicated supplies—simply put, I needed to keep the project simple because of the number of participants and the limited time frame. But the students still found ways to paint or decorate their brooms with sharpies and felt pens . . . I can’t say I’m too surprised by their ingenuity, but it definitely pleased me.
Thank you to the conference organizers. It was a joy to work with the students, hang out with old kidlit friends, meets some new ones, and even get the opportunity to lunch with my favourite aunt.
(And my apologies to the janitorial staff who had to deal with the aftermath of my workshop room. We tried out best to clean up after ourselves. Ironically, making almost ninety miniature brooms involves a lot of sweeping up afterward.
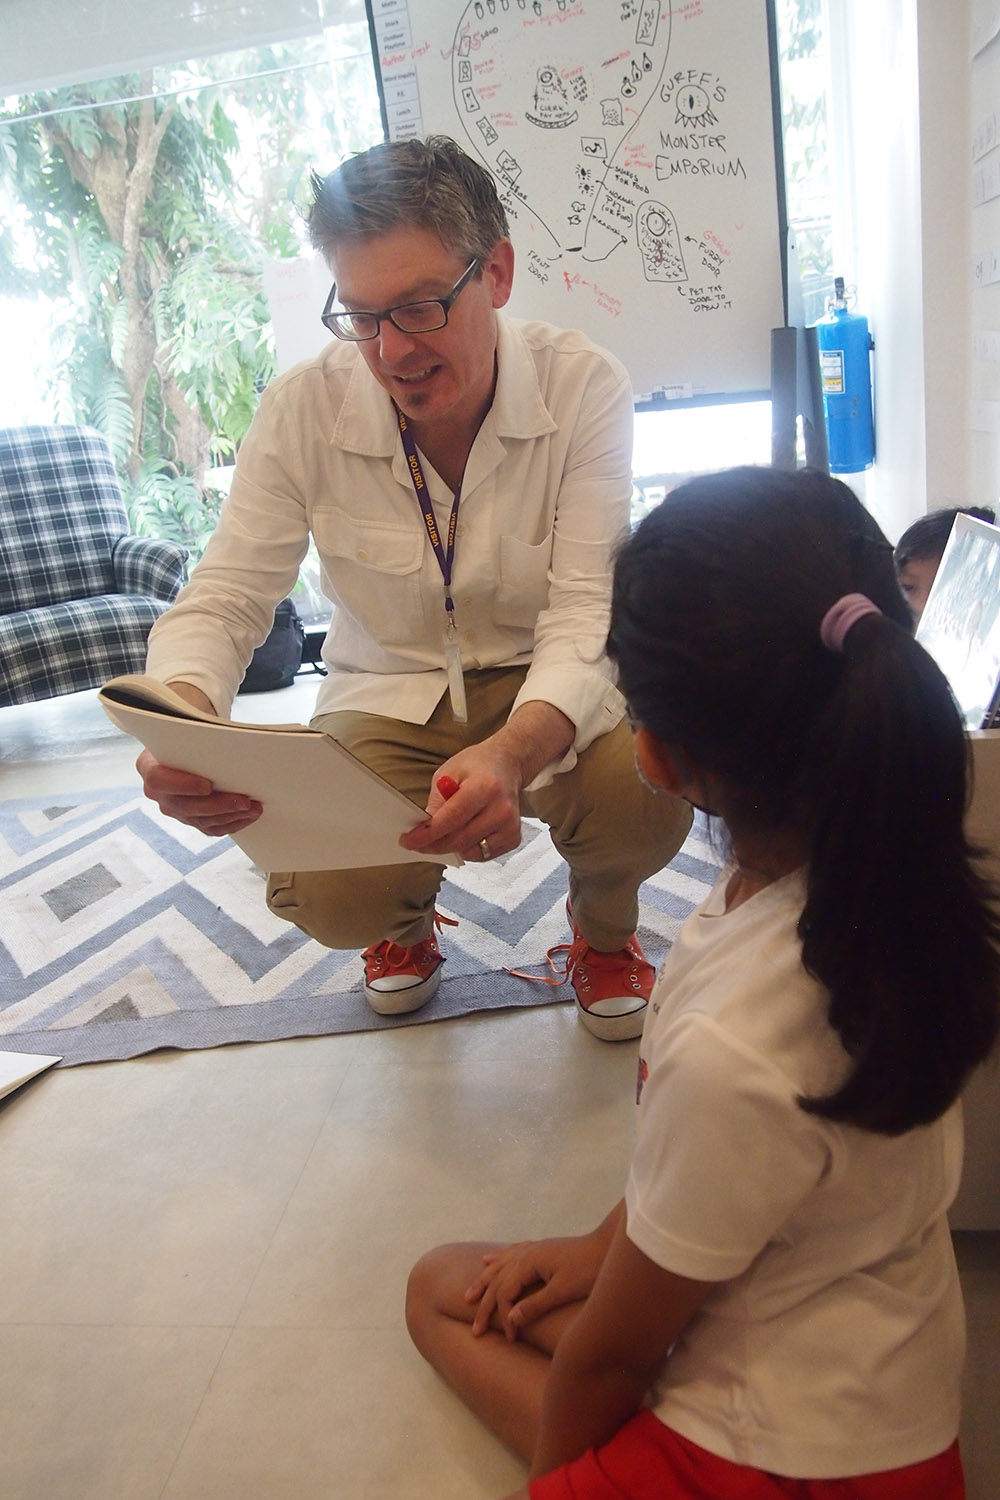
I wrapped up residency at a local school this week, which is always bittersweet! I spend so much time working with the kids and then it seems over in a heartbeat. But over the past four weeks, we sure had fun building our worlds—in the case of the intermediaries, that was a magical school, and for the younger ones a monster pet store. You can see the creativity bursting off their pages!
I rolled out a fun activity in my creative writing class recently, as part as my ongoing attempt to help my students add intrigue and mystery to their stories. I brought in a stack of envelopes and got them to imagine that one of their characters received a mysterious letter—but a letter that had been through quite an adventure, as demonstrated by the condition of the envelope.
So . . . we took those crisp white envelopes and splattered and dabbed paint on them to represent mud, we smudged them with fingerprints, we nibbled them with stapler removers, we scorched them with a candle, and we sealed them with wax. All of this was to give the envelope some history and spark that sense of adventure in a story.
Many of the students chose to draw ornate designs on the envelope, and others chose to draw stamps as well. (Doing this activity made me realize that the stamp design could be a whole side project and it would be fun to draw those on a separate page then cut them out and affix them afterwards.)
Of course, the students also wrote something to be included inside the envelope. Some of them had invisible ink messages from a previous class they wanted to put in there, while others chose to write a series of riddles or a provocative threat.
It was my first time doing this specific activity, but it was definitely a lot of fun to beat up those envelopes! This project would certainly serve as a fun story starter and, in that case, the entire writing assignment could be the letter inside (as opposed to adding texture to an existing story, which is what I did for this particular class).
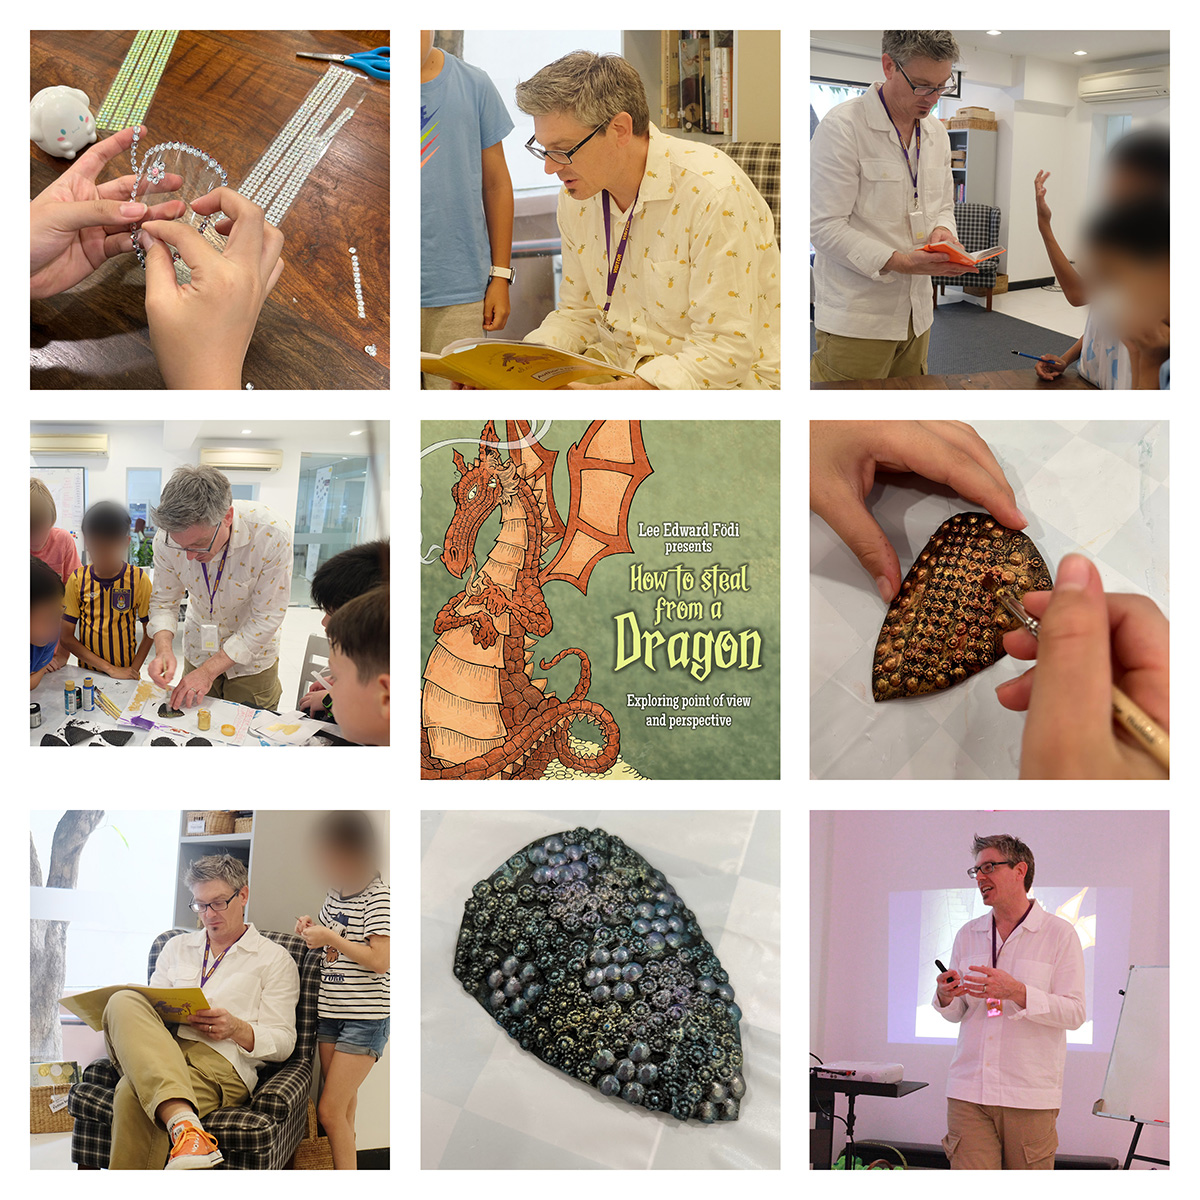
In one way, it feels like a lifetime ago that I was on my mini artistic tour of Bangkok, but I’ve still found myself reflecting on my experience with the schools there. It’s also taken me this long to review all the photos! So, here’s a photo dump!
The first school involved a complete writer/artist-in-residence package, working with the same groups of kids over multiple sessions. This allowed me to introduce a “meaty” project that involved visual brainstorming, writing, and prop-building, something that could be sustained over several sessions. It also offered teachers enough material so that they could continue working on the project after my time at the school ended.
Even though I’ve delivered many residences in the past, this is the first one since before the pandemic where I spent several consecutive days in a row at a school. So, it was an intensive creative output—not only for the students, but also for me! I found myself so energized at the end of each day that I would often head back to my hotel and write in a frenzy for an hour or so.
Each grade was given a different “theme” to work on, which not only helped with some cross-creativity in the school, but kept me energized, so that I wasn’t simply doing the same thing over and over again.
Monster Magic (for the Year 3s)
For this grade, the theme was based around the idea of a character who visits a monster pet store, buys a bet monster-in-a-bottle, then takes it home to hatch it (incorrectly!). The project involved mapping out the pet store, writing hatching instructions, building the actual pet monster-in-a-bottle, and crafting the individual scenes of the story.
Spell-binding Shopping Trip (for the Year 4s)
I invited the students to imagine a character who has been sent to a magical market to locate one specific enchanted item—and then write about it. A big part of this project was imagining the market in detail. We mapped it, imagined food shops and services and brainstormed problems a character might encounter while exploring the market, such as having to barter or survive pick-pockets. We also built miniature brooms, which could either be the items the characters were searching for, or be something that helped them along the way.
Escape from the Wizard’s Library (for the Year 5s)
For this project, we sent characters to retrieve a book from a dangerous library! We mapped out the libraries and worked on specific scenes to bring the situation to life. A fun part of this project was building the actual spell books!
How to Steal from a Dragon (for the Year 6s)
This project involved an examination of character perspective and point of view. We imagined two main characters, the first being a dragon and the second being a thief who wanted to steal a scale from that dragon. This led to many conversations about how we wanted to steer the readers’ sympathies. We wrote legends about the dragons that could be discovered to be false once the more conventional parts of the stories took shape. And, of course, we built the dragon scales!
Once I finished at the first school, I headed to a second one where I spent one session with each grade, from Kindergarten all the way to Grade 8. These were more like a conventional school visits for me. There was no time for prop-building or to review the students’ writing, but we did get to complete some fun visual brainstorming!
As part of my time at the schools, I was also able to do some parent talks, individual mentoring, and a professional development session with teachers. It seemed there was never a dull moment and I’m particularly thankful to all the arrangements made by my hosts. Each residency comes with a unique set of challenges, but dealing with jet lag and a new locale are ones I don’t always have to deal with!
I’m now embarking on another residency at a school closer to home, here in Vancouver. The fun continues (though the food won’t be as good, since I won’t have access to all of that fresh fruit like I did in Bangkok)!
I recently did a two-day visit at a Vancouver school where I had the opportunity to work with the entire student body, Ks to Grade 7s, delivering a variety of brainstorming activities.
I had a different topic for each group:
Ks – Enchanted Trees
1s – Magical Boxes
2/5s – Secret Doorways
4/5s – A Spellbinding Shopping Trip
6/7s – Escape from the Wizard’s Library
I loved seeing all the creative output! The design of the sessions allowed me a bit more time to see their work. Along the way, there were fantastic questions and conversations about creativity, and an opportunity to expand our idea of what it means to “write.”
I wrapped up a writer-in-residency at a local school, Southpointe Academy, in April. It seems like a lifetime ago because, since then, my family has moved homes for the first time in eighteen years (more on that in a future post, I imagine!).
I’ve now had time to reflect on the residency and look back at some of the photos from my week at the school. We accomplished a lot of writing and storytelling!
I was asked to develop a plan for K-5 and so came up with a different project for each grade.
Kindergarteners: Costuming a Character
Grade 1s: Magical Boxes
Grade 2s: Enchanted Trees
Grade 3s: Secret Doorways
Grade 4s: A Spellbinding Shopping Trip
Grade 5s: Lost in the Library
I kicked off the week with one general presentation to the entire school, which allowed me to introduce myself—and my philosophy—so that I didn’t have to repeat this each time I visited the specific classrooms.
The fantastic aspect of a residency is that I get to spend multiple blocks with the same class. In general, the system was the same: enter the classroom, introduce the project with some brainstorming and scene starters, then follow up in additional sessions with more specific writing advice, presentation, and an in-depth Q & A.
Of course, the format was tweaked depending on the age.
Another positive to spending an entire week at the school was that I could set up my museum of artifacts in the library and students could come view them throughout the week for extra inspiration.
Finally, the school asked me to write a story about them during my time there and I did just that. This turned out to be a lot of fun, and I ended up writing about an imagined misadventure with the Grade 5 classroom’s mascot, Yorick the skeleton.
Afterward, I was happy to receive these kind words from Southpointe’s writing coordinator:
“Everyone at our school loved having Lee as our Author-In-Residence, as he is such an engaging and inspirational writer and teacher! He connected with all our students from K to Grade 5 who loved his fun, interactive workshops, which focused on making the writing process accessible to all! I would recommend Lee without hesitation.”
Verity Pritchard Southpointe Academy
More info about my residencies can be found on my website.
I’ve been fine-tuning my plan for my writer-in-residency that I’m doing at a school next week— five straight days with students K-5! We’ll be covering a range of topics and writing approaches, but one of the main goals for the visit will be to amplify overall creativity.
When it comes to my own writing process, one of my favourite ways to attack this is by mapping, and it’s something I bring to schools as well, either guiding students through a process on chart paper, a white board, or—if I’m presenting via Zoom or to a large audience in an auditorium—through a document camera.
This is a great way to generate ideas or for a writer to simply understand a space. Many of my young students (or even my teens) often craft scenes but leave the reader completely in the dark as to where it takes place (sometimes I don’t even know if the scene is inside or outside)! Mapping out a world, a building, or even a moment can make a real difference! More information about my author presentation, craft workshops, and residencies on my website.
By the way, if you’re looking for an excellent book on mapping, writing, and creativity, then I highly suggest The Writers’ Map, edited by Huw Lewis-Jones!
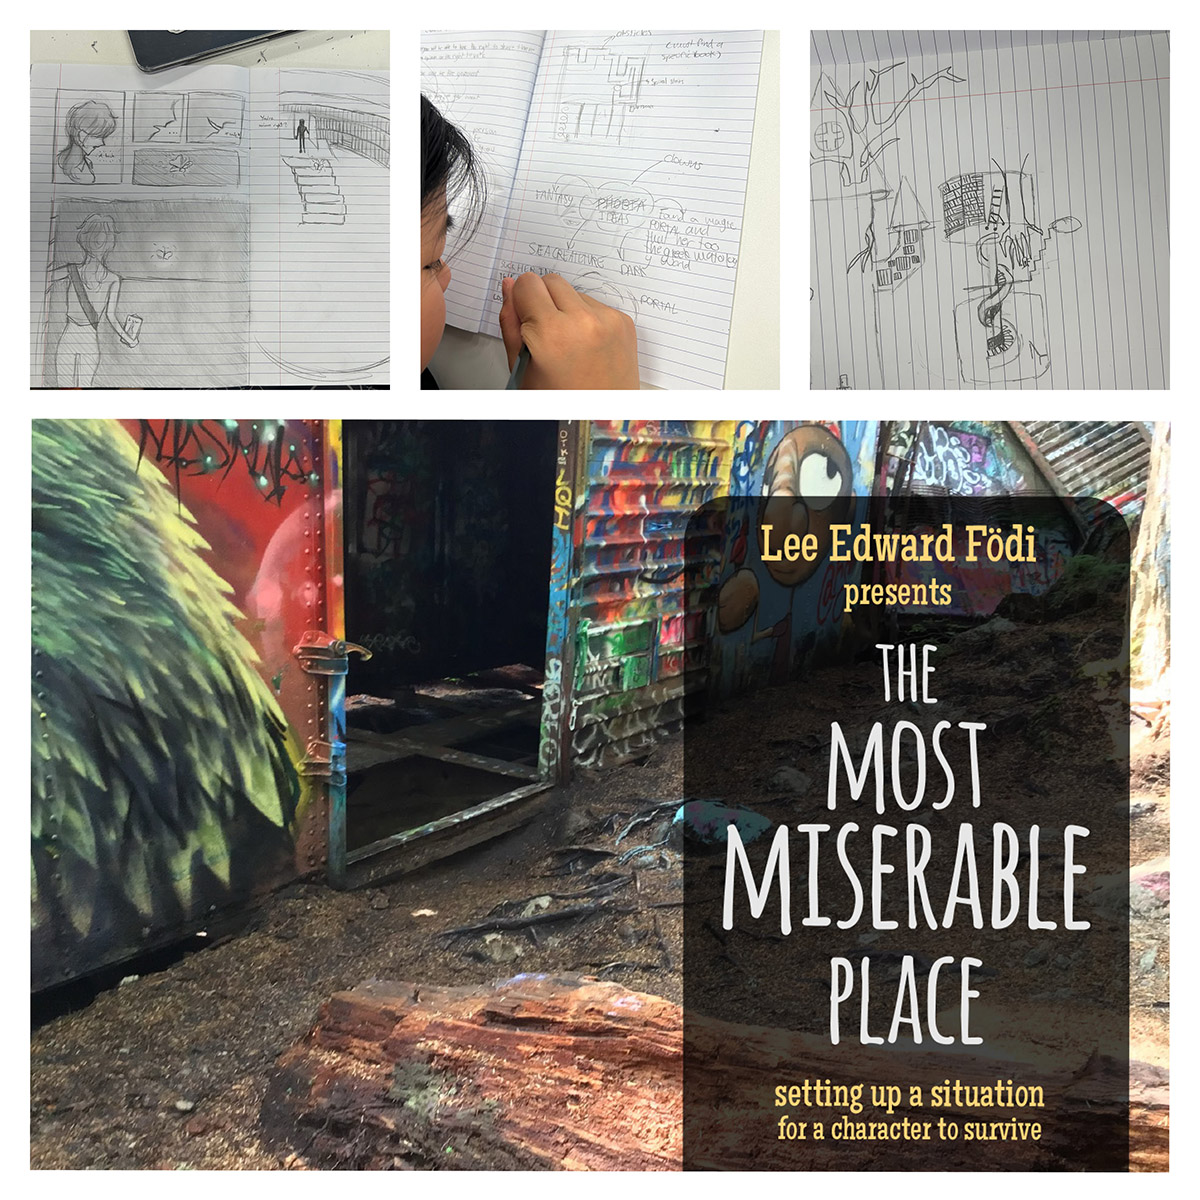
I recently wrapped up a writer-in-residency with a group of gifted learners through the Vancouver School Board and Artstarts. Over the course of several weeks, myself and fourteen students came together in a central location to talk writing and reading—and to create.
My teaching partner and I led students (and their characters!) in an epic journey, exploring various facets of storytelling. I had students take each week as a scene, doing my best to slow them down and take each part of their plot as an important “moment.” I wanted them to concentrate on idea-building and the process of story development, as opposed to simply the product.
As part of this approach, I had them work on many hands-on activities over the course of the program. There was plenty of visual brainstorming, but also some prop-building. Students crafted magical creature eggs, created potions from kits I prepared for them (you should have seen our house that day!), and wrote riddles in invisible ink.
I was in a gifted learning programming myself as a kid, so am always extremely grateful to work with classes like these, where we can pursue our passions and explore our imaginations. It’s hard to capture the magic of these situations, but I’ve done my best with a few photographs that I could snap along the way . . .
My four-year-old I sat down the other day to do some writing, but instead of doing it the usual way (in which he narrates something for me to transcribe), I decided I’d roll out an activity I often do during an author visits at a school or library: Interactive mapping.
Mapping is a fantastic strategy for brainstorming ideas or to simply getting the creative juices flowing. I have many students (especially older ones) who find it hard to sit down and begin the process of writing—they find it hard to turn off all the other things that are pestering them. This sort of activity can serve as a “warm-up” exercise or a transition for the brain. Plus, it’s fun (and shouldn’t creativity be fun?).
For Hiro and I, we started out in one corner of our respective pages, and mapped our characters’ journeys toward treasures in the opposite corner. We created specific problems and obstacles along the way. We both did separate maps, building off our own ideas, though Hiro asked me to swoop in at certain points to do some drawing and labelling for him. (Hiro had an “ice” theme in his adventure—I especially like his “ice monster.”)
As mentioned above, I do this kind of thing with elementary and middle school students all the time, but it was the first time with a preschooler, and it ended up being far more entertaining for him than I would have guessed.
At the end of June, I finished up a year-long project at an arts-based high school in Kamloops (about four hours outside of my home city of Vancouver). Over the many months, I delivered a series of world-building activities, all via Zoom, first because of the pandemic and then because the roads were cut off after our extreme flooding (and then because of covid again).
I do a lot of teaching and speaking over digital technologies, but it’s always a bit more challenging when art is involved because I simply don’t get a chance to lean over shoulders and see what everyone’s working on in the moment. Sure, people can send me photos and files, but it’s never quite the same, mostly because I find it harder to connect with the students.
Luckily, I was finally able to make the trip to Kamloops in the last week of June to deliver a keynote speech to the entire school body and to view their amazing gallery of work. The biggest surprise? The students were so engaged, asking me so many questions, and showing some genuine interest—these were things that I just didn’t pick up on during our virtual sessions. So, there was a connection, and that made the experience extremely rewarding.
As for the specifics of the project, the students were divided into teams to create five different realms: Ice, Sky, Underground, Land, and Water. The worldbuilding was applied to every course in the curriculum—not only the obvious ones such as art and writing, but also science and math.
The result was really amazing. As I wandered the gallery of their Enchanted Earth, I found sculpture, myths, recipes, maps, constellations, language systems, field guide entries for creatures, dioramas . . . pretty much every corner of these worlds was imagined and explored.
I’m showing pictures of just a fraction of the amazing pieces.
I want to extend my thank you to all the students and staff at Kamloops School of the Arts (secondary pod), in particular my partner Melanie Gilmar, who spearheaded the entire initiative. A big thank you to ArtStarts, the funding body for the project.